Box for transporting your figures

planetFigure

Help Support planetFigure:

This site may earn a commission from merchant affiliate links, including eBay, Amazon, and others.

jitch0t

Well-Known Member
Joined
Dec 14, 2003
Messages
364
Location
Lleida - Spain
Hi guys. We've seen the pF members' first figure and workbench... I think it can be interesting too to see what do you use to take your figures to the shows... and if you have the plans... better! (yes, i'm planning to build my own box :lol: ).

Ok, who wants to share? ;)
 
I just built one myself. Didn't make plans or take pictures but I can tell you it was difficult to decide on the dimensions.

Firstly I had to check with the airlines to see what would or would not fit in the overhead compartment. Then I discovered that such a box wouldn't fit a portion of my figures (90mm). So I had to compromise and go with the airline dimensions and take the large figures on a case by case basis.

I basically made a box with the opening in the front. I then secured 1/2" x 1/2" strips of wood at varying levels on the sides of the box so I could slide in "trays" (pieces of plywood) to which the figures would be attached using funtak.
 
Good question. I'm curious to see how others do this too.
I went through several methods before settling on this one.
I use those semi clear file folder boxes with the lid and handle. I get them from the local Dollar General store, just $4.00. To secure the figs, I added a loose piece of 1/4" plywood cut to fit the bottom of the box. Then I added a 5/16" dia. bolt sticking up through the bottom of the plywood and secured with a nut. The figure bases have a just slightly larger hole drilled in their bottoms and slip down onto the bolts. Then I added rubber stick-on feet in the corners on bottom for it to rest on.
I have 2 pieces of plywood, one with a single bolt for a large base and one with 4 bolts to hold several figures.
This is probably no good for taking on a plane trip but it works well in the car :).
If you would like, I can take pictures tonight.
Craig
 
If you want a box to fit under the seat on a plane it cannot be higher than nine and one half inches. The width should be around 9-10 inches and it should not be deeper than ten inches. I have never had a problem and prefer under the seat as opposed to overhead bins. Make the box easy to open for inspection and show the security people what it is before it goes through the scanner. I have never had a problem with this.
 
I use clear plastic boxes, usually the shoe box size. I then cut blocks of foam rubber (make sure to get good quality foam that won't leave a lot of "crumbs" to clean up) ranging about 1-2 inches square. I use the large blocks to rough out a compartment for the figure, then put it into place and carefully wedge smaller blocks to hold it. I find that this holds the figure securely, yet absorbs vibration. If I am shipping a commission piece, I use the same technique, but place the box containing the piece inside a larger box, surrounded by packing peanuts. No problems so far in sending stuff packed this way by UPS.
I am leery of any type of "hard" mounting since I transported a large box of scratchbuilt aircraft to a contest about 250 miles away for a local club member. They were mounted on bases and taped to the bottom of the box. After a 20 mile stretch of road construction the landing gear snapped off every one of them. I called and got the okay to repair and enter them. On the way home I put a layer of foam under them, and they made it with no damage. I realize out figures are generally more sturdy than landing gear, but it was lesson I will never forget.
Jim
 
I use individual cardboard boxes that are slightly larger than each piece I'm travelling with. To secure each base to the box, I use a trick that was passed onto me by Bill Dunkle - use velcro. I stick 1/4" squares of the fuzzy side to each corner of the base and attach the coarse side to the bottom of the box. Firmly press the base into the bottom of the box and voila! I've never had a problem with the bases detaching from the box at all, and removal is pretty straightforward (particularly if asked by security to show or remove them). All these go into a standard hard-side carry-on suitcase, so it's guaranteed to fit into the overhead compartment (I can also carry books, magazines, CD's, etc. in the side-pockets). To keep the boxes from rattling around, I fill up the suitcase with my display materials - velvet, cardboard backdrop, etc. - and t-shirts & socks if necessary. Granted, I'm carrying around more little boxes than necessary, but they make for good display risers ;)

I've only had one problem with security while travelling with this arrangement. I got picked for a random check when travelling to the Atlanta show 2 years ago. There was no problem with security personnel looking through each box (I just politely asked them to be careful and they were cool with that).
 
Marc,
I took pictures of my travel case tonight. I'll post one here and you can go to this link to see the rest of them...

Travel cases

The box is a standard size for holding US size hanging folders. I would assume that there is something similar available in metric sizes where you are (Europe right?).

I told you that I use a bolt to mount the figure to the base. This will work just fine but I actually do it a little bit differently. What I use is a piece of hadrware that comes from a trophy. I was able to get a handfull of these and they worked nicely so I used them. It's a cylinder that's threaded on the inside and has a hex base to it. I put this on the top of the base plate and attach it with a bolt from the underside. You'll be able to see what I'm talking about in one of the pictures.

Also, I added some pictures of another way I can transport a single figure.
It's a clear acrylic box that I bought at a local crafts store. It's also very inexpensive. One end comes off of it like a lid. I took this end and drilled a hole through the middle and added a bolt and nut just as I did with the big box. It's also a nice way to display a figure and keep the dust off of it. Again, you'll see what I'm talking about in the pictures.

You had also asked for some dimensions in metric. The 5/16" bolt is about the same diameter as an M8 bolt. As for the length, it only needed to stick up above the nut by about 20mm (3/4"). So with the plywood base at about 6mm (1/4") thick plus the nut plus the 20mm extension, a bolt maybe 35-40mm (1 1/4"-1 1/2") long should do okay. Then just drill a hole maybe 1/2mm (1/64") larger in diameter than the bolt and long enough to fit most or all of the bolt extension into it. The more bolt in the hole, the more stable the figure will be.
For the boxes and the base plate, I put a 30cm long scale next to them so you can judge about how big they are.

I hope this helps you out. If you have any questions, please feel free to ask and I'll try to clarify anything I can for you.
Good luck! :)
Craig
 

Attachments

  • post-1-1091577438.jpg
    post-1-1091577438.jpg
    57.3 KB
Thank you so very very much Graig. That's the box where i 'am waiting for.
I 'am going to look this weekend for such a box this weekend.
Yes, in Europe (holland) they sell this kind of cases also.
Now i 'am gonna have a box for my own instead of putting some bluetack to my dashboard in my car to travel.

Again thanks for the metrics and for sharing

Marc.
 
Now i 'am gonna have a box for my own instead of putting some bluetack to my dashboard in my car to travel.


Maaan! That is very brave to say the least! Phew, you must be driving like a saint with your figures on your dash and hope some dumb driver dont slam on the breaks infront of you!


As for how I carry my figures, it is by no way an ideal situation as it is way large, but I got a big black and decker toolbox that I blu tack the figures to.

I need to construct something new though so this thread is super!

Although I have noticed a very dangerous situation with the blue tack, make sure you take it ALL off the base when putting up your display, as otherwise the blu tack sticks to the velvet and could pull it enough to flip your other figures to the ground, believe me, I almost did it at Tulsa!
 
Hi Marc,
You're welcome. Glad I could help you out.
I have a correction to my post. I'm at work and looking at my metric/english conversion chart. I see that 1-2mm is way too big for the clearance hole in your base. It should be more like 1/2mm larger than the bolt.
Sorry about that, I was trying to go from memory of the size :(

So...blue tack on your dashboard ..man you are brave (hehe).

Good luck and let me know how it works out for you.
Craig
 
He Guys,

My English is not so well. I'll try to explain. It is more the console between dashboard and gear tunnel There is some space about 15 cm x 15 cm and 10 cm high.
When i go to my club i take some blue tack and the figure is in this space.
And yes in Antwerp there are a lot of situations that you must brake hard. Most at the time i have one figure with me (the one in progress) and the space between the figure's and the "box" is filled with old clothes. So it is " save" for the figure.
I know, it is not the perfect solution. But i got the solution now.
Next thuesday when i go to my club i have a box just as Craig.

Thanks again

Marc
 
Hey guys, nice ideas I see here. Thank you.

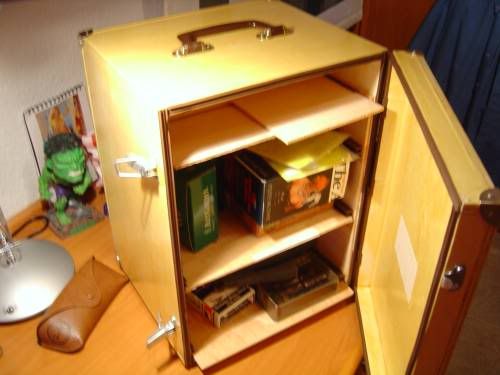
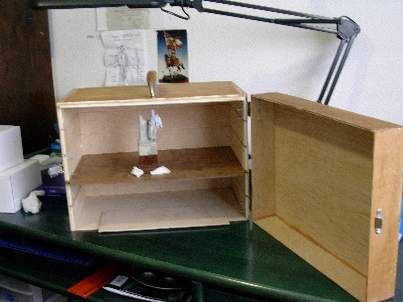
Some spanish friends from Lilliputmodel.com forums posted these two boxes.

caja2.jpg

caja1.jpg


I think I'll try to do a similar one.
 

Latest posts

Back
Top