Measuring Per Parts Of Oil Paint?

planetFigure

Help Support planetFigure:

This site may earn a commission from merchant affiliate links, including eBay, Amazon, and others.

PropBlast

Moderator
Staff member
Joined
Oct 23, 2016
Messages
409
Location
United Kingdom
I know how easy to mix acrylic paints using measuring parts as drops but how do you measure out parts for your colour mix using oils? For example using the colour in the screen shot below how would I get that using oil paints. I know it gives me percentages but how do I measure them out?

ScreenHunter_26 Aug. 12 11.31.jpg
 
In my opinion unless you are mixing large volumes which could be measured using a graduated container this has to be done by eye.

I use a pallette knife and take approximate proportions and mix until the colour looks right.
Oil mixes are usually given as parts not % eg 5 parts red, 2 parts yellow ochre , a touch of blue etc.
I've never seen it done with oils like your image for acrylics.

I always end up mixing far too much because of having to make adjustments.

Bill
 
In my opinion unless you are mixing large volumes which could be measured using a graduated container this has to be done by eye.

I use a pallette knife and take approximate proportions and mix until the colour looks right.
Oil mixes are usually given as parts not % eg 5 parts red, 2 parts yellow ochre , a touch of blue etc.
I've never seen it done with oils like your image for acrylics.

I always end up mixing fat too much because of having to make adjustments.

Bill


Thanks Bill. So how would you measure out 7 parts black for example?
 
I do it all by eye. I choose a suitable amount to be one part then make the proportions larger or smaller as required.

The difficult part for me is knowing which colours to use. I have a small book called the oil painters pocket palette which I find useful. It doesn't give proportion just colours. It's a bit trial and error but oil paint comes in pretty large tubes and minis use very small amounts, just as well as I always mix far too much.

Bill
 
If I may offer this (note; this is a purely personal opinion) and having read the above linked article, some comments on points raised.
His constant referral to needing to use mineral/white spirits in regard to painting with oils, is a very misleading statement for those wishing to try them.
Being a classically trained and user of oils for over forty years, the only time I have ever used any kind of thinner, was to create a wash or glaze, never for the application of a pure layer of colour.
Linked to this are the remarks made on the covering power and drying time reduction when using thinners.
The explanation for his issues are self evident. Like all mediums, oils have a complex formula of ingredients and properties, when you add said thinners, you alter the properties and disrupt their behavior.
Yes, the drying time will be reduced somewhat, simply because you are washing out the 'oil', which is the key ingredient to the drying time overall. You are also weakening the pigment, reducing the covering power.
These same problems will be inherent when copying his method of transferring oils to 'dropper' bottles, which seems to be nothing more than trying to emulate the properties of acrylics, and the so called advantage of measuring out colours for mixing. In this respect, I totally agree with Bill, in that the 'by eye' method is the only answer, and will come naturally with experience.
I can guarantee this, if you follow this method, you will have major issues with coverage and the dreaded brush marks that so many new users complain of, which only occur when applying too much paint to the surface.
Some people soak out the excess oil on card before using. This in itself is a double edged sword. If you don't, some colours will 'skid' across the surface, whilst if you do, others will 'drag and refuse to lay down in an even layer.
One very important point to remember is the primer. Oils require a 'tooth' to cling to. Better put, a roughness to the primer surface, and not to the surface of the piece itself.
Another thing to note is, as with acrylics, the ambient temperature and humidity. This applies to both mediums, but for different reasons, and is a whole other topic.

As said, purely my personal opinion based on my experiences over many years.

Ron
 
Echo all of Ron’s points..and add - lay out blobs of the gamut you select across top, down side of your pallette- try disposable paper ones they are cheap and using palette knife start with the lightest pigment for the mix and add darker..quantities are in exact and no matter as it’s gradients that count anyway..because oil pigments tend to dry closer to original colour from the tube, and acrylics often don’t, oils are just fine mixed to eyeball satisfaction..white spirits are for washes, for weathering tanks..not even best to clean brushes..excess white spirits and mediums added to paint weaken the film, tend to fading…think canvass painting- the old masters weren’t sloshing white spirits all over..
 
I do dabs of colors which is blobs of paint described above. Look at color some color mixing videos on YouTube. They will show you that if you added too much how to bring your color back. We can describe what we do but those videos will show you.

The worst case of mixing colors is you will wind up with a grey color. Been there done that.
 
Ron covered it very well. Having been an oils guy for well over 30 years, I don't see them as a "by a recipe" medium. They are very much by eye and by experience. They can be very forgiving, and unforgiving, all at the same time. Just gotta dive in and learn them.
 
Which ever medium people choose to use, there is no substitute for experience. This is especially true of colour mixing and, even given the amount of books and videos available, many are put off by the seemingly endless 'recipes' offered.
Although the acrylic users are far more catered to in the choice of available pre-mixed colours...even then...a rudimentary knowledge of colour mixing will still be required at some point.
Sadly...for whatever reason...many users are happy with so called 'straight from the bottle' solutions from the vast range of colours available off the shelf.
There is no easy answer to mixing a given shade, the simplest solution being to 'suck it and see', which is being somewhat naive to say the least, more so if you have absolutely no idea of what given colours mixed together will give you.
Thing is, this applies to all mediums, not just oils. However, there are basic rules that can be applied to all mediums, and these are the keys to success. Take the time to learn and apply these rules and the rewards are many.
There's no denying that colour mixing is a complex subject. However, there is something very satisfying in creating your own unique shade for a given piece, whether metal or material, flesh or leather, it's a just reward for your time and effort.

Ron
 
After reading the above link on “painting miniatures with oil paint guide and tips”, I am amazed by the author’s techniques.

Like Ron, I have been using artist oil paints for my figures for over forty years. I have never premixed my oil paint with mineral spirit in a dropper bottle. I transfer small blobs of paint onto paper palette and then mix it with a palette knife. You add a little bit here and there “by eyeball” until you get the colour that looks right to you. There is no instant premix or by using a colour chart. You learn it from trial-and error and from experience.

Oil paints are slow drying. It is the nature of the paint and has its advantages. The safest way to accelerate the drying time is to mix a touch of quick drying colour to slow drying colour. For example, add a touch of Umber to Cadmium Red, this will speed up the drying time considerably without changing much of the tone at all.

Quick Dryers (24 hr.)

BURNT UMBER
BURNT SIENNA
RAW UMBER
RAW UMBER
PRUSSIAN BLUE

Medium Dryers (2-3 days)

YELLOW OCHRE
INDIAN RED
OXIDE OF CHORMIUM
LEMON YELLOW
VIRIDIAN
NAPLES YELLOW
COBALT BLUE

Slow Dryers (3-7 days)

CADMIUM YELLOW
CADMIUM RED
ALIZARIN CRIMSON
FRENCH ULTRAMARINE
IVORY BLACK
MAGENTA
WHITE

Some years ago Bill had asked me about mixing shadow and highlight shade for my Asian flesh tone mix (naples yellow + burnt umber + crimson + viridian + white) for his Samurai.

Here is how I mix my oil paint.

First I mix up some Asian flesh tone. Then by adding a touch of burnt sienna for the shadow using wet on dry. Apply shadow onto the base flesh tone colour that is fully dry. I use a glaze (almost dry brush) to apply the shadow and highlight.

paint1.JPG


paint2.JPG


paint3.JPG
 
To add to Felix’s drying times list- Williamsburg, Old Holland..makers often give relative drying times on their websites..and modern pigments -pyrole, hansa..and some blacks take forever..vermillion is really slow..and whites vary per inclusion of zinc from slow to forever..
 
In my opinion, you are just asking for trouble when thinning oil paints. I always used straight out of the tube over a base acrylic coat. The only time I ever thinned was if it was an old tube and the paint had partially hardened. Then only a drop of white spirits. Some tubes have a lot of oil. In that case, I would squeeze some out on a paper towel to absorb the excess oil. Then transfer to the palette, which for me was a 3x5 card inside a plastic sandwich bag.
It is important to really “spread the paint out” on the figure. You want a very thin layer of oil paint. Always used a square tipped badger hair brush for that.
 
I think what I'm really getting is that people use a dab of this, a splodge of that and the like. I guess for example if you use the same utensil like a cocktail stick, a wooden chopstick square ended or similar, and you dip the end of it in the paint it could be possible to nearly an exact colour each time.
 
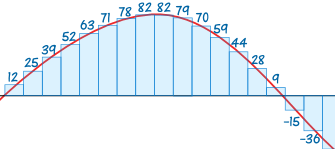
Actually I think you have gotten the gist but missed the point if you will. Oils are, for a better analogy, analog technology. Measuring out acrylics in exact amounts, digital. If you are doing a graph of a digital signal vs. analog, the digital would look like a set of stairs, with exact even increments. The analog, a continuous ramp, with no set increments. You get more precise measurement with digital, but are limited to whatever increments its in. In this case, drops of paint. The analog provides infinite levels, but is less precise. You can select an amount (color) anywhere on the curve, but its not a precise, amount. You have to tune it a bit, without depending on preset levels. Even if you use the same instrument to pull out tiny blobs of oils paint to try and measure it, there are still going to be differences. The size of the blob, it height, width, density, is never going to be exactly the same. Close perhaps, but close isn't why you want to measure. In the amounts you will be using to paint figures, that difference can be the difference between a base color, a highlight or even a shadow. You will be back to adjusting it by eye. So perhaps the effort of using a tool to pull out tiny blobs will help you get close, but you will still be doing fine color adjustments by adding a little of this, a little of that, which is what oils come down to in the end.
Visual aids!
analog-digital-graph.gif
 
I met a guy several years back who was so OCD about colour mixing that he had a book of mixes...not just the colours used...but the amount of each colour by weight! (he used a set of lab grade scales which cost a fortune).
Another often missed fact when trying to replicate a described mix...whether it is from a book or video...is what brand of oils are being used...and does the reader/viewer have the exact same brand to work with.
Also...even if they are the same brand...are they from the same range...e.g. artist or beginners...believe me when I say...there will be variations between them...and most certainly between different brands labelled as the same colour.
I have two particular brands that I exclusively use...Old Holland and Sennelier...but this is focused on my particular preference for 'transparent' hues...around which my personal technique is based.
A bonus also being...I find replicating previous mixes far easier with these than traditional 'opaque' colours...along with the ability to render far more subtle shades when shading and high lighting.
However you choose to measure out the colours for a mix...be it a brush or toothpick etc. ...you will never get it right first time and...again...this is where experience/practice come into play when knowing what to add to correct it.
I find it a shame that so many attach such importance to this aspect of painting...often to the detriment of the simple pleasure of painting.

Ron
 
If you really want to mix oil paints by measuring per parts, here is a colour mixing recipes book which mix paints by parts ratio.
It also includes a plastic grid sheet that allows you to squeeze the paint onto the grid sheet to measure the parts according to the recipe. I have this book. Personally I think it is just too much, is a waste of time and money and I never used it. It takes away the pleasure of mixing colour. All you need is by eyeball, trial and error. Practice makes perfect. With some experiences eventually you can mix and match any colour mentally before physically mixing on the palette.

IMG_0007 (3)b.jpg


IMG_0003 (2)c.jpg


IMG_0001 (2)d.jpg


IMG_0005 (2)c.jpg
 
Thanks Bill. So how would you measure out 7 parts black for example?

thats not the way oils work, you can take notes as what hues you use but it is more or less done by eye and even on the model itself .
Two top quality painters come to mind with different approaches
Dave Mitchell. Jots down everything and can look back years of notes.
Brian Snadden . Jots down nowt and still gets amazing results
 
Back
Top