Review Latest from Mitches Military Models - ECW Parlamentarian Cavalryman

planetFigure

Help Support planetFigure:

This site may earn a commission from merchant affiliate links, including eBay, Amazon, and others.

Nap

Moderator
Staff member
Joined
Aug 7, 2006
Messages
42,619
Location
Beautiful Bampton, Devon
Hi Guys ,

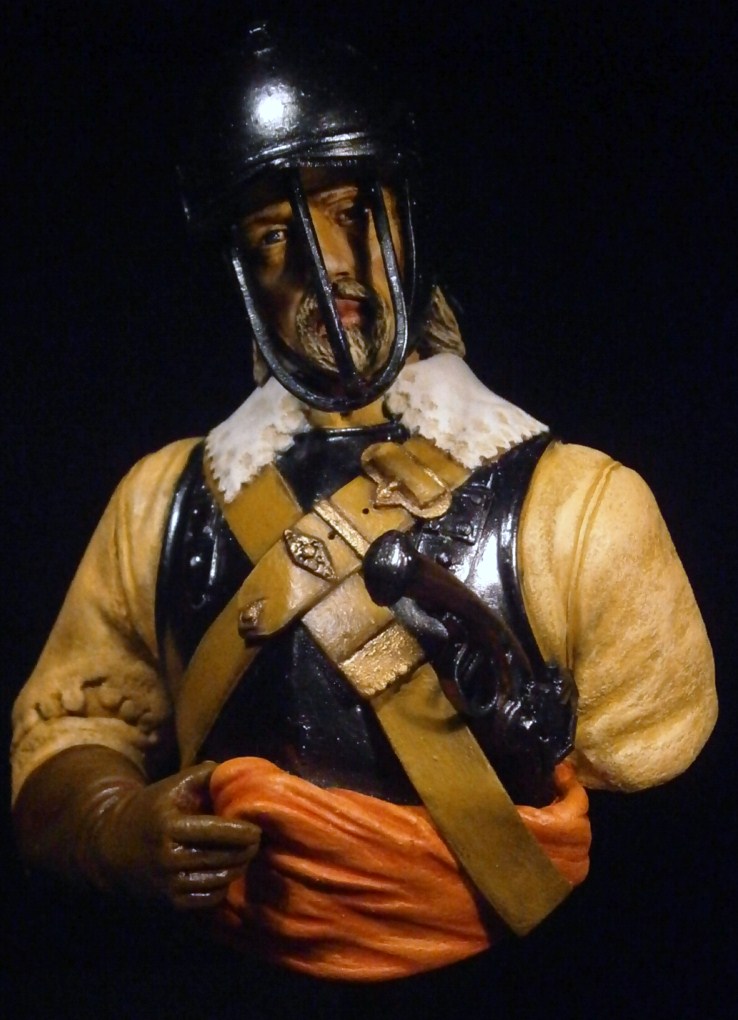
Well what have we in front of me this time something a little different to the nomal Napoleonics from Mitches Military Models (MMM for the purpose of the review!).......a bust from the English Civil War , a cavalryman or Ironside .

We all know the owner of MMM , yes its that man with the 120 napoleonics (see link: http://www.planetfigure.com/threads/new-napoleonic-set-mitches-military-models.46366/watch-confirm), the one and only Mr Gordon Mitchell aka grod on PF.

Here is Gordons original post on this bust: http://www.planetfigure.com/threads/new-ecw-cavalry-bust.46246/watch-confirm .

Lets have a little bit of history though about the war itself:

It was an Armed conflict in the British Isles between Parliamentarians and supporters of the monarchy (Royalists) from 1642 -1651. Tension betweeen Charles 1st and the House of Commons had been building for some time, and after his unsuccessful attempt to arrest five members of Parliament, both sides prepared for war. The first phase of the wars (1642 – 46) was initially characterized by inconclusive encounters, but victories by Parliamentarian forces under Oliver Cromwell at the Battles of Marston Moor and Naseby turned the tide. In 1646 the Royalist forces were disbanded. In 1647 Charles I negotiated with a Scottish group for assistance, starting the second phase of the wars, a series of Royalist rebellions, and a Scottish invasion. All were defeated, and Charles I was executed in 1649. The fighting continued, and Royalist forces under Charles II invaded England in 1651. Parliamentary forces defeated the Royalists at Worcester in 1651 and Charles II fled abroad, effectively ending the civil wars. The wars' political consequence was the establishment of the Commonwealth and Protectorate.

Ask anyone with a remote knowledge of history and they will say it was between the lavishly attired Royalists with long curly hair and finery and the god fearing Puritans ..but it was more than that it was a war that brought to light the specialised cavalry ....the Ironside , dressed in a buff coat with a lobster tailed helmet .

Continued in next post:

Nap
 

Attachments

  • E1.jpg
    E1.jpg
    215.6 KB
  • 11%20Newbury%2003_jpg_jpg.jpg
    11%20Newbury%2003_jpg_jpg.jpg
    52.4 KB
  • 11%20Newbury%2010_jpg.jpg
    11%20Newbury%2010_jpg.jpg
    48 KB
  • dhm0693b.jpg
    dhm0693b.jpg
    30.3 KB
  • dhm0693c.jpg
    dhm0693c.jpg
    32.4 KB
  • thumbnailCAPYTGKR.jpg
    thumbnailCAPYTGKR.jpg
    10.7 KB
Open the box I hear you say , so what of the box itself ........

The packaging is a white cardboard box , coming with a colour picture on the front of a bust painted by Gordon himself , inside the contents were well secured in plastic bags and wrapped with bubblewrap , protecting the contents :

Whats in the box then young kev I hear you cry :

Subject: Parlimentarian Cavalryman

Sculpted by: Pete Morton

Casting by: Pete Morton

Scale: 200mm

Material: Resin( cast in a light gray colour)

No of Pieces: 8 pieces (plus another 2 which make up the base itself that is provided)

Continued in next post:

Nap
 

Attachments

  • E3.jpg
    E3.jpg
    318.5 KB
  • E2.jpg
    E2.jpg
    329.4 KB
Lets start with the biggest of the pieces ..the torso itself:

This is a large piece of resin in its own right , he hs been sculpted wearing the front and back breast plates , normally blackened to help prevent rust in the british climate ...often harsh and very wet!!! Over his shoulders he has 2 leather belts and around his waist he has a sash , at his neck is a lace collar .

Looking at the area's now the breastplate is mainly the front piece , details are very well doneas I expected from Pete , there would normally be a proofing mark (where a pistol was shot a the plate to test it, this left a round "dent") , this area is covered when the weapon is put into place , although as proofing was done in no particular place so could be put on just above the pistol ...the choice is yours , the shoulder pieces are made up of individual pieces , detail is really great , undercuts are first class .

The belts are another area of fine undercuts , again with some nice details on them , particularly the buckle , there is a piece that fits on the end of one of the belts , this is clean and looks spot on .

The collar sits nice over the neck/shoulder area , folds are natural and it looks like the material it should be , the edges are nicely but softly sculpted, painting will bring these area's out .

The sash is a masterpiece and again looks like the material often used , ranging from damask to silk , the whole thing is full of folds and movement .

The torso has arms with the left one cast onto the torso , the surface is slightly rough to simulate the buff coat itself ..nicely thought out Mr M(y)

The back of the torso has a large casting remnant which will take a bit of work to remove leaving a hollow backpiece which ends just below the shoulder ...some might want to fill this in with additional putty , probably something I would think about to assist in basing up using a rod ...again a personal choice .

Continued in next post:

Nap
 

Attachments

  • E4.jpg
    E4.jpg
    1.1 MB
  • E5.jpg
    E5.jpg
    1.1 MB
  • E6.jpg
    E6.jpg
    1.1 MB
  • E7.jpg
    E7.jpg
    1.1 MB
  • 10breastplate400px.jpg
    10breastplate400px.jpg
    41.1 KB
  • Trucks trcks 2010 westgate tower musem 003.jpg
    Trucks trcks 2010 westgate tower musem 003.jpg
    19 KB
Lets have a look at the right arm now :

This consists of 2 pieces the upper arm and the lower which is encased in a long gauntlet , looking at the upper first again nicely sculpted with a little bit of a texture , a really quality touch is the scalloped edging at 3/4 length . , there isa little bit of a casting remnant to remove to ensure a perfect fit to the shoulder, folds again are as they should be .
The gauntlet itself has a casting piece to remove at the elbow end , I would suggest pinning as well , fingers are well done with the hand holding onto the sash to support the weight of the pistol thrust through (there is a tiny casting plug to remove from the inside of the thumb).

Fit to the shoulder is no problem , but again I would say pin it .

Continued in next post:

Nap
 

Attachments

  • E11.jpg
    E11.jpg
    1.1 MB
  • E8.jpg
    E8.jpg
    1.1 MB
  • E9.jpg
    E9.jpg
    1.1 MB
  • E10.jpg
    E10.jpg
    984.9 KB
Lets now move onto the head , this is encased in the famous lobster tailed helmet so evocotive of the ECW.

The face is a nice sculpt coming with facial hair in the form of a nice beard , cheekbones are high , with the eye details being very well done , allowing easy painting , hair falls from underneath the helmet ..perhaps it me but he has the look of Vincent Price !!!!

The helmet is cast around the face , there is a casting piece to remove from the top of the helmet , Cheek pieces are well done also (the rivets are of particular note) with good undercuts in all area's .
The "lobster" tails are another area of fine sculpting and rivet details with just a tiny moulding line to carefully sand away .

You will need to fit the top piece/ brim of the helmet (remember rivets to the top!!) in addition the face bars themselves will also need careful fitting , some might want to pre drill the locating holes as well or perhaps replace the cast ones with suitable wire (the supplied ones are perfectly fine again a matter of choice) .

Fit into the neck area is fine after a small amount of resin from casting is removed .

Also included on the sprue with the face bars are the end of the belt (see other post) .

The end result will be one of a fine helmet well detailed and looking the part .

Continued in next post:

Nap
 

Attachments

  • E13.jpg
    E13.jpg
    1.1 MB
  • E14.jpg
    E14.jpg
    1 MB
  • E15.jpg
    E15.jpg
    1 MB
  • E16.jpg
    E16.jpg
    1.1 MB
  • E17.jpg
    E17.jpg
    1 MB
  • E18.jpg
    E18.jpg
    1.2 MB
  • m_YCM_inflob.jpg
    m_YCM_inflob.jpg
    19.9 KB
On now to the weapon he has tucked into his sash : the wheelock pistol

A wheellock, wheel-lock or wheel lock, is a friction-wheel mechanism to cause a spark for firing . It was the next major development in firearms technology after the matchlock and the first self-igniting firearm. The mechanism is so-called because it uses a rotating steel wheel to provide ignition. Developed around AD 1500, it was used alongside the matchlock and was later superseded by the snapchance (1560s) and the flintlock (c. 1600).
The wheelock works by spinning a spring-loaded steel wheel against a piece of pyrite to generate intense sparks which ignites powder in a pan, which flashes through a small touchhole to ignite the main charge in the firearm's barrel. The pyrite is clamped in vice jaws on a spring-loaded arm (or 'dog') which rests on the pan cover. When the trigger is pulled, the pan cover automatically opens, and the wheel spins as the pyrite is pressed into contact.


Consisting of 2 pieces the main body of the pistol and the mechanism ( called the "dog") itself .

The main piece is well done and good details , small amount of flashing to remove from the trigger area , fit of the actual meachanism is a little fiddly but worth the effort in the end result .

Once made up the fit into the sash is tight and looks good , the weight of the pistol pushing the material out in all the right places .
 

Attachments

  • 1620pistol4.jpg
    1620pistol4.jpg
    55.7 KB
  • 1620pistol1.jpg
    1620pistol1.jpg
    27 KB
  • 1620pistol2.jpg
    1620pistol2.jpg
    27 KB
  • 1620pistol3.jpg
    1620pistol3.jpg
    50.6 KB
Finally lets have a look at the base that has been included :

This consists of a shaped round pice of varnished wood , together with a piece of dowel that fits into the hole provided in the mainpiece .

Due to the make up of the back of the bust I am not too sure how it would fit in but you are all a wealth of idea's , saying that this is a nice touch from MMM but probably something that is not needed IMO as most modellers will use a larger base with a brass rod ..but if you don't use it then its to the spares box perhaps for a 54mm single figure...but as always its a personal choice.

Continued in next post:

Nap
 

Attachments

  • E23.jpg
    E23.jpg
    1.2 MB
  • E22.jpg
    E22.jpg
    1.3 MB
Finally my overall thoughts on the bust itself :

This is a well sculpted (as expected) model , of very interesting subject , the time you spend prepping will be rewarded many times over when you have the finished piece in the display cabinet , painting will be a challenge , so why not vary the belts and the buffer coat itself , the breastplate will give you the opportunity to try out your mettalic painting or perhaps why not use Non Metallic Metal painting .

Presentation is nicely done with secure packaging , perhaps the colour picture could be a little clearer but you always have the website pictures to refer to .

I do hope that Gordon get Pete to do another bust sculpt for him ...very soon , a good partnership and one I look forward to seeing grow.

WELL DONE Mr M and Mr M (y)(y)

Available in a limited number at £28.50 +£2.50 p&p UK, £6.50 europe and £9.50 rest of the world.
If anyone needs any information contact Gordon by e mail to [email protected] or by pm on PF

MMM's website : www.mitchesmilitarymodels.co.uk

A great Reference book on this subject is the book in the Warrior range from Osprey Publishing , written by John Tincey and illustrated by Graham Turner called Ironsides - English Cavalry 1588-1688 (Warrior No 44) , ISBN 1-84176-213-X (www.ospreypublishing.com) .

Also a great day out and full of buff coats and ECW armour is Littlecote House in Wiltshire (just about 5 miles form where I live !!!!) ..if you live in the UK then here's some directions:

Exit the M4 at Junction 14 and take the A338 to Hungerford. After approximately 3 miles turn right onto the A4 and at the next roundabout take the 1st exit following the A4. Shortly afterwards turn right onto the B4192 signposted to Littlecote House. After approximately 1 mile the road bends sharply to the right, take the small road straight ahead and the entrance to Littlecote House is approximately 1/2 mile on the right hand side.

A big thank you to MMM for the review model .

Nap
 

Attachments

  • parli1.jpg
    parli1.jpg
    62 KB
  • ECW bust2 005.jpg
    ECW bust2 005.jpg
    180.5 KB
  • ECW BUST 003.JPG
    ECW BUST 003.JPG
    142.1 KB
  • ECW BUST 005.jpg
    ECW BUST 005.jpg
    178.4 KB
  • ECW BUST 006.jpg
    ECW BUST 006.jpg
    176.9 KB
  • ECW BUST 008.jpg
    ECW BUST 008.jpg
    177.9 KB
This is one I would like to do one day as I have never done an ECW piece. Nice review Kev.
 
Hi Guys ,
Thanks again for all the comments .

Jazz ,
This is one you would paint up well mate

Kevin ,
Replied to your pm , glad you are sorted but here are some more pictures and details on the wheellock if anyone else can use them .
Operation

On pulling the trigger of a wheellock firearm, the sear effects a slight rotation as described above. The end of the sear arm (that has hitherto locked the wheel and prevented it from turning) is disengaged, leaving the wheel free to turn under the tension of the mainspring. There is a subtlety here that is of vital importance: the "hole" in the side of the wheel, into which the sear engages, is not a parallel-sided shaft. If it were, then under the tremendous tension of the mainspring, it would require a huge force on the trigger to disengage the sear. Nor is the tip of the sear arm cylindrical, which would have a similar effect. Rather, the "hole" is a depression in the wheel, and the sear has a rounded end: the wheel is locked by reason of lateral force on the shaft of the wheel rather than vertical force on the sear.

As soon as the wheel is released by the sear, the longer arm of the mainspring pulls the chain engaged in it. The other end of the chain being fixed to the cam on the wheel shaft, the latter rotates at high speed, whilst the rotating cam pushes forward the arm to which the pan cover is attached, thus causing the pan cover to slide forward towards the muzzle of the piece, and the pyrites to fall (under tension of the dog spring) on to the now rotating wheel. This is the second purpose of a sliding pan cover: were the pyrites to engage a stationary wheel, it would almost certainly jam the mechanism: but the timing allows the pyrites to slip off the sliding pan-cover on to an already rotating wheel.

The rest of the action should be obvious: the fast rotation of the wheel against the pyrites produces white-hot sparks that ignite the powder in the pan, which is transferred to the main charge in the breech of the barrel via the vent, and the gun discharges. The wheellock took around a minute to load, prepare and fire. Many contemporary illustrations of a wheellock pistol in action show the gun held at a 90 degree angle rather than vertically: this was to ensure that the priming powder in the pan lay against the vent in the barrel, and avoided a 'flash in the pan' or misfire

If I can help anymore then please do contact me .


Nap
 

Attachments

  • DSC00470.jpg
    DSC00470.jpg
    134.1 KB
  • oldwerder2A.jpg
    oldwerder2A.jpg
    23.8 KB
  • oldpair.jpg
    oldpair.jpg
    18 KB
  • oldwerder2.jpg
    oldwerder2.jpg
    23.8 KB
  • RSM-seite.jpg
    RSM-seite.jpg
    14.9 KB
  • thumbnail.jpg
    thumbnail.jpg
    10.7 KB
  • Radschlossmuskete.jpg
    Radschlossmuskete.jpg
    34.6 KB
Back
Top