Gellso
A Fixture
This is the story so far with the Marine I got from Gordon at Mitches Military Models.
I attempted Multicam before with a Corry Brit Para bust conversion and found the method and colours I used turned out a bit more woodland tone than MTP.
Having seen the majority of pictures and videos of guys wearing MTP it seems to have more of a green tinge overall and it is this tone I wanted to try and replicate with this guy. I think rather than fully imitate the pattern of MTP it's one of these that you need to try and "fool" the eye, much akin to the guys who dot digicam rather than have straight edges.
My first attempt at MTP camo had a basecoat of the sandy colour and I used colours I felt were close to the actual material.
This time I went for a light green base to hopefully get a tone I was happy with.
The pics are a bit rushed as it does take some time to paint a 200mm figure and I was painting the arms and torso at the same time. I darkened the last picture to what I felt is closest to the colour and tone in real life.
All colours are Vallejo
Basecoat of Field Grey lightened with Pale Sand
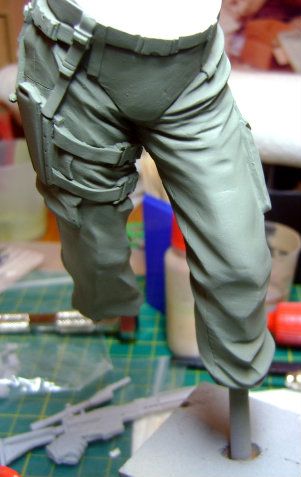
Airbrushed U.S. Tan Earth lightened with Pale Sand. I have airbrushed a darker mix of the same colour to give a gradient but my camera washes out alot of brown but you'll see it in further photos.
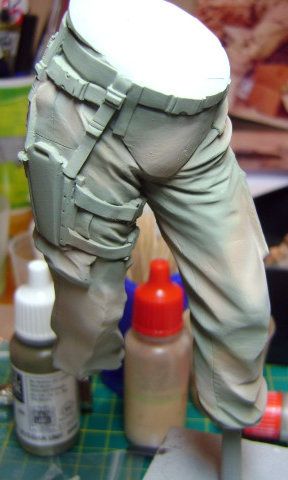
Airbrushed Field Grey . I wasn't too bothered about being careful with this as the pattern shows gradients, hard edges and soft edges which you will see come together as other colours are painted around it. So it's quite forgiving.
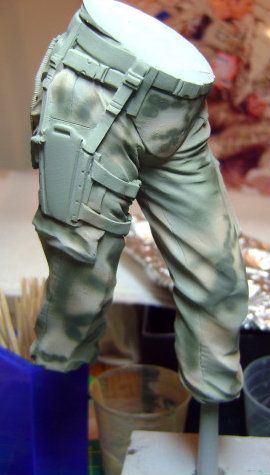
I then used the basecoat colour to detail and intersect the brown and dark green to try and help them "meet up".
This pattern doesn't have an overall pleasing balance of colours when you look close at it. Some large areas of the uniform are predominantly greens and other large areas predominantly browns. But when viewed from a little further away it looks perfectly balanced. Not annoying enough when trying to paint it.
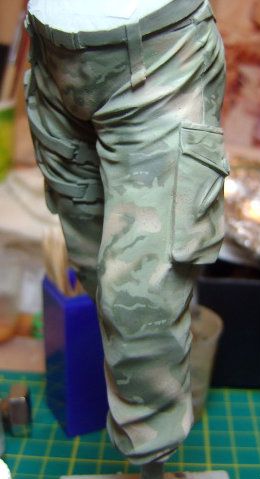
I then used Chocolate brown lightened with pale sand for the darker brown.
You can see the sandy colour gradient just above his left knee.
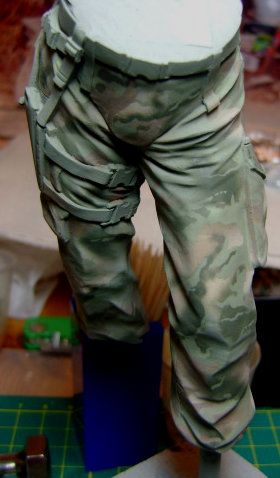
Due to the transparancy of Acrylics the colours can change a wee bit as you cross colour boundries but I'll run a few washes of a light green when completed to hopefully bring them together. The dark brown looks like it doesn't belong at the moment but it's still early days and I'll try and blend it in a bit more. I'll do more detailing and add another shade of green before finishing with the flecks of almost white and almost black, which again I hope will bring it together. The camo is quite confusing to paint because there doesn't seem to be a set layering of the colours which is probaly why it works so well in real life.
I'll post more WIP shots as I go.
Any questions please feel free to ask.
I attempted Multicam before with a Corry Brit Para bust conversion and found the method and colours I used turned out a bit more woodland tone than MTP.
Having seen the majority of pictures and videos of guys wearing MTP it seems to have more of a green tinge overall and it is this tone I wanted to try and replicate with this guy. I think rather than fully imitate the pattern of MTP it's one of these that you need to try and "fool" the eye, much akin to the guys who dot digicam rather than have straight edges.
My first attempt at MTP camo had a basecoat of the sandy colour and I used colours I felt were close to the actual material.
This time I went for a light green base to hopefully get a tone I was happy with.
The pics are a bit rushed as it does take some time to paint a 200mm figure and I was painting the arms and torso at the same time. I darkened the last picture to what I felt is closest to the colour and tone in real life.
All colours are Vallejo
Basecoat of Field Grey lightened with Pale Sand

Airbrushed U.S. Tan Earth lightened with Pale Sand. I have airbrushed a darker mix of the same colour to give a gradient but my camera washes out alot of brown but you'll see it in further photos.

Airbrushed Field Grey . I wasn't too bothered about being careful with this as the pattern shows gradients, hard edges and soft edges which you will see come together as other colours are painted around it. So it's quite forgiving.

I then used the basecoat colour to detail and intersect the brown and dark green to try and help them "meet up".
This pattern doesn't have an overall pleasing balance of colours when you look close at it. Some large areas of the uniform are predominantly greens and other large areas predominantly browns. But when viewed from a little further away it looks perfectly balanced. Not annoying enough when trying to paint it.

I then used Chocolate brown lightened with pale sand for the darker brown.
You can see the sandy colour gradient just above his left knee.

Due to the transparancy of Acrylics the colours can change a wee bit as you cross colour boundries but I'll run a few washes of a light green when completed to hopefully bring them together. The dark brown looks like it doesn't belong at the moment but it's still early days and I'll try and blend it in a bit more. I'll do more detailing and add another shade of green before finishing with the flecks of almost white and almost black, which again I hope will bring it together. The camo is quite confusing to paint because there doesn't seem to be a set layering of the colours which is probaly why it works so well in real life.
I'll post more WIP shots as I go.
Any questions please feel free to ask.


