


- Joined
- Nov 24, 2005
- Messages
- 1,573
This is one of those figures that I had seen around for some time and thought it looked good, but never got around to buying one. Something about it struck me as odd, but I could never exactly put my finger on what that something was. Recently I have been on a bit of a Marine kick, and wanted to do a Tarawa vignette in 120mm or 1/16th scale, so I decided I would take the plunge and buy this one. Now, this is against my better judgment, as I have been burned by Verlinden figs on more than one occasion, and had sworn them off. A little too much mixing and matching of parts from other figures to create “Frankenstein figures” for my liking. As they say, fool me once…
So the box arrived at my door, and without further hesitation I open it up and found…

Hey, where’s the Verlinden box? You know, the green one, with the woodland camo pattern on it? What we have here is a quite flimsy, fold together plain brown box, with a rather low quality photo of the finished figure (complete with the now ubiquitous gulf war oil well fire backdrop) glued on which serves as both the assembly and painting reference. Ok, not a biggie, it’s just the box. I can assemble the figure and paint it without a good boxtop picture. Breathe in, breathe out...
Ok, on to the parts.

Overall the casting is smooth and the sculpting is well done, with nice folds and wrinkles in the uniform. There are some nice undercuts in the open blouse (shirt to you civilian types). Mine had a couple of tiny blobs of resin here and there in some of these undercuts. The #12 x-acto took care of those in short order.

The arms w/Garand blue tacked to the torso. Fit is better once the blue tack is removed
Having the Garand and the arm molded as one piece is nice, they are well cast. No open handed grip here, as can happen when weapons and hands are molded separately. Makes painting a little more difficult, but the trade off is worth it.

Yes, thats supposed to be an M1 steel pot helmet. More on that later in the show

Though truth be told, this appears to be the same Verlinden Garand from days gone by, and its a bit chunky and lacks finesse in comparison with some other manufacturers Garands. The charging handle is nothing but a little blob on the side, it should be a bit longer and slightly hooked forward toward the end. Though listed as 120mm, he’s really in the 1/16th ballpark, so the 120mm Garand looks even larger in his mits. Maybe he’s just a small guy. It works though, unless you are a Garand aficionado.

Its missing a stacking swivel (the small metal loop on the underside of the barrel, near the back of the bayonet handle), a sling and the sling swivels, as well as some other minor details that most figure guys will care not one iota about. But a sling would have been nice, as the real thing is pretty much always seen with one. We can fix this, we have the technology
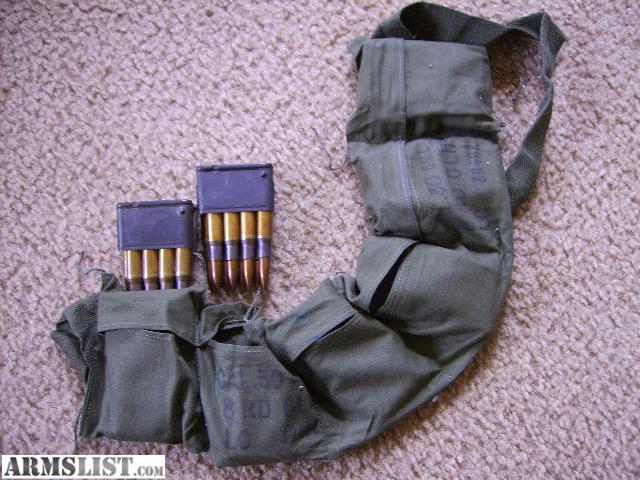
The grenades and canteen are old Verlinden standbys as well, and like the Garand, the grenades are a little on the chunky side. Like a Grapefruit compares to an orange. I think Verlinden took the term “Pineaple grenade” quite literally when sizing these monsters. Included is an ammunition bandolier that is attached at the shoulder, with the strap being molded in to the top of the shoulder and across the back of the figure. There are 2 problems with this. First the bandolier has only 5 pockets. The real thing had 6.

"We don't throw these grenades, we shot put them at the enemy"
And it’s a bit skinny, in a flat sorta way. When loaded with 30 cal ammo clips, the bandolier was quite bulky. I guess that might be considered 2 problems… anyhow, the next issue. They have the strap of the bandolier tied in a knot in the middle of his back. The strap on the real bandolier was a sewn to each end of the ammo pockets and formed a continuous loop and was not tied in a knot.

"Nice ass"
I guess this guy might have cut his for some reason, but it’s not the norm. Perhaps they confused the bandolier with a pressure bandage and how it gets tied on. Preferably I would just leave it off, but the entire back of the HBT uniform is sculpted with folds and wrinkles caused by the bandolier strap, and one side of the blouse (shirt) is pulled up over it, so it has to stay. Hmmm…
The base. Please contain your excitement. Its flat on bottom, and suitably base like

The legs are well molded and go together without any problem. They have some rips and holes in them, though one of them on my copy might be an air bubble. Still, they are nicely sculpted with good fabric effect, especially where it drapes over the boots. The cut out on the side is keyed to fit into the upper torso. The boots are fine, there’s not much of them to be seen as they are covered by the loose hanging pants.

Cat hair shown for scale purposes only, and is not included with the kit.
The upper torso with attached head.
After looking at this figure in person, I at first thought he just had a thick “bull neck”. To correct this, I decided that I would trim down the back of his neck a bit. After working on this for a short time, I realized what the true issue was. Its not that his neck is too thick, it’s that his head is small, too small for my liking. I then compared his head to other 1/16th scale figs I have (not 120mm, which would in theory be even larger, though he’s listed as 120mm) and his head looked like a child’s compared to theirs.

Notice the thinness of the bottom of the HBT blouse. Careful removal of the casting block is necessary here to prevent snapping of the thin resin. Note the angled key that matches up with the slot in the legs. This complicates removing the pour stub a bit, but it does help support the thin resin in the lower blouse. The ammo belt is part of the upper torso, and is “OK”. I think the ammo pouches are a bit too shallow, as is the texture on the belt itself. Some careful painting may improve it a bit and pop the detail out. They just look a bit flat, like the bandolier.
His M1 helmet, sized to fit his head, it about the size of a helmet LINER compared to a Warriors, DES or S&T M1 steel pot helmet. Placing one of those helmets on his head was comical. Think “Dark Helmet” from “Spaceballs”.
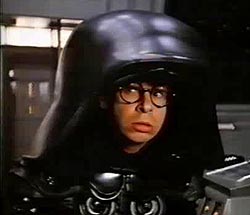
"You rang?"
Not to mention the kit helmet resembles a mushroom cap more than a cloth covered M1 steel pot. Hmmm…

Something here is not like the others... DES, Warriors w/camo cover, a mushroom cap, Warriors w/o cover
Some assembly
First thing I did was remove the minor mold line that runs up the neck and under the chin. That’s about it as mold seams go. Removal of the casting blocks was straightforward, except making sure not to remove the angled key from the bottom of the upper torso. Though large, the pour stubs came off fairly easy. I used a razor saw for the first cut, then cleaned it up with an X-acto and some sanding when necessary. Careful handling is required after removing the pour stub to prevent breaking off the thin lower edges of the HBT blouse.

I stepped in WHAT???
The parts fit together quite well. Once you glue the legs together, they are keyed so that they can attach to the upper body in one position only. The arms are also keyed and fit well, though some slight adjustment might be necessary to get the Garand lined up with the left hand.

Once everything was together, he fits the bill and strikes me as a good representation of a Marine mopping up on day 3 at Tarawa . They were quite distinctive in that many carried no equipment other than their ammo belt and perhaps a canteen, everything else being discarded due to severe heat and fatigue. Also, the rolled sleeves and open blouse are characteristic of Marines from this battle. I’m sure there are other campaigns he could be used for (Saipan, Peleliu come to mind), but to me, he’s a Tarawa Marine.
...continued below
So the box arrived at my door, and without further hesitation I open it up and found…
Hey, where’s the Verlinden box? You know, the green one, with the woodland camo pattern on it? What we have here is a quite flimsy, fold together plain brown box, with a rather low quality photo of the finished figure (complete with the now ubiquitous gulf war oil well fire backdrop) glued on which serves as both the assembly and painting reference. Ok, not a biggie, it’s just the box. I can assemble the figure and paint it without a good boxtop picture. Breathe in, breathe out...
Ok, on to the parts.
Overall the casting is smooth and the sculpting is well done, with nice folds and wrinkles in the uniform. There are some nice undercuts in the open blouse (shirt to you civilian types). Mine had a couple of tiny blobs of resin here and there in some of these undercuts. The #12 x-acto took care of those in short order.
The arms w/Garand blue tacked to the torso. Fit is better once the blue tack is removed
Having the Garand and the arm molded as one piece is nice, they are well cast. No open handed grip here, as can happen when weapons and hands are molded separately. Makes painting a little more difficult, but the trade off is worth it.
Yes, thats supposed to be an M1 steel pot helmet. More on that later in the show
Though truth be told, this appears to be the same Verlinden Garand from days gone by, and its a bit chunky and lacks finesse in comparison with some other manufacturers Garands. The charging handle is nothing but a little blob on the side, it should be a bit longer and slightly hooked forward toward the end. Though listed as 120mm, he’s really in the 1/16th ballpark, so the 120mm Garand looks even larger in his mits. Maybe he’s just a small guy. It works though, unless you are a Garand aficionado.
Its missing a stacking swivel (the small metal loop on the underside of the barrel, near the back of the bayonet handle), a sling and the sling swivels, as well as some other minor details that most figure guys will care not one iota about. But a sling would have been nice, as the real thing is pretty much always seen with one. We can fix this, we have the technology
The grenades and canteen are old Verlinden standbys as well, and like the Garand, the grenades are a little on the chunky side. Like a Grapefruit compares to an orange. I think Verlinden took the term “Pineaple grenade” quite literally when sizing these monsters. Included is an ammunition bandolier that is attached at the shoulder, with the strap being molded in to the top of the shoulder and across the back of the figure. There are 2 problems with this. First the bandolier has only 5 pockets. The real thing had 6.
"We don't throw these grenades, we shot put them at the enemy"
And it’s a bit skinny, in a flat sorta way. When loaded with 30 cal ammo clips, the bandolier was quite bulky. I guess that might be considered 2 problems… anyhow, the next issue. They have the strap of the bandolier tied in a knot in the middle of his back. The strap on the real bandolier was a sewn to each end of the ammo pockets and formed a continuous loop and was not tied in a knot.
"Nice ass"
I guess this guy might have cut his for some reason, but it’s not the norm. Perhaps they confused the bandolier with a pressure bandage and how it gets tied on. Preferably I would just leave it off, but the entire back of the HBT uniform is sculpted with folds and wrinkles caused by the bandolier strap, and one side of the blouse (shirt) is pulled up over it, so it has to stay. Hmmm…
The base. Please contain your excitement. Its flat on bottom, and suitably base like
The legs are well molded and go together without any problem. They have some rips and holes in them, though one of them on my copy might be an air bubble. Still, they are nicely sculpted with good fabric effect, especially where it drapes over the boots. The cut out on the side is keyed to fit into the upper torso. The boots are fine, there’s not much of them to be seen as they are covered by the loose hanging pants.
Cat hair shown for scale purposes only, and is not included with the kit.
The upper torso with attached head.
After looking at this figure in person, I at first thought he just had a thick “bull neck”. To correct this, I decided that I would trim down the back of his neck a bit. After working on this for a short time, I realized what the true issue was. Its not that his neck is too thick, it’s that his head is small, too small for my liking. I then compared his head to other 1/16th scale figs I have (not 120mm, which would in theory be even larger, though he’s listed as 120mm) and his head looked like a child’s compared to theirs.
Notice the thinness of the bottom of the HBT blouse. Careful removal of the casting block is necessary here to prevent snapping of the thin resin. Note the angled key that matches up with the slot in the legs. This complicates removing the pour stub a bit, but it does help support the thin resin in the lower blouse. The ammo belt is part of the upper torso, and is “OK”. I think the ammo pouches are a bit too shallow, as is the texture on the belt itself. Some careful painting may improve it a bit and pop the detail out. They just look a bit flat, like the bandolier.
His M1 helmet, sized to fit his head, it about the size of a helmet LINER compared to a Warriors, DES or S&T M1 steel pot helmet. Placing one of those helmets on his head was comical. Think “Dark Helmet” from “Spaceballs”.
"You rang?"
Not to mention the kit helmet resembles a mushroom cap more than a cloth covered M1 steel pot. Hmmm…
Something here is not like the others... DES, Warriors w/camo cover, a mushroom cap, Warriors w/o cover
Some assembly
First thing I did was remove the minor mold line that runs up the neck and under the chin. That’s about it as mold seams go. Removal of the casting blocks was straightforward, except making sure not to remove the angled key from the bottom of the upper torso. Though large, the pour stubs came off fairly easy. I used a razor saw for the first cut, then cleaned it up with an X-acto and some sanding when necessary. Careful handling is required after removing the pour stub to prevent breaking off the thin lower edges of the HBT blouse.
I stepped in WHAT???
The parts fit together quite well. Once you glue the legs together, they are keyed so that they can attach to the upper body in one position only. The arms are also keyed and fit well, though some slight adjustment might be necessary to get the Garand lined up with the left hand.
Once everything was together, he fits the bill and strikes me as a good representation of a Marine mopping up on day 3 at Tarawa . They were quite distinctive in that many carried no equipment other than their ammo belt and perhaps a canteen, everything else being discarded due to severe heat and fatigue. Also, the rolled sleeves and open blouse are characteristic of Marines from this battle. I’m sure there are other campaigns he could be used for (Saipan, Peleliu come to mind), but to me, he’s a Tarawa Marine.
...continued below


") , outlining the errors with citations, offering correction suggestions and a hilarious sprinkling of humor! Thanks for posting
, outlining the errors with citations, offering correction suggestions and a hilarious sprinkling of humor! Thanks for posting