HOW I SCULPTED MY FIRST 90MM ...

planetFigure

Help Support planetFigure:

This site may earn a commission from merchant affiliate links, including eBay, Amazon, and others.

quang

A Fixture
Joined
Oct 10, 2003
Messages
1,708
Location
Mechelen, Belgium
Hello Planeteers,

As you may (or may not) know, I usually work in 120mm and bigger scale (for the busts).

Following some friendly but nevertheless muscular persuasion ;), I finally tried my hand at a smaller scale: 90mm or 1/20. Changing scale can be quite a stressful experience, so I decided to record it in photos to share with you.

It's NOT a detailed article on sculpting (like Gary's authoritative s-b-s). Rather a string of photographic sequences depicting the making of a figure. Some of you may found the order of the sequences disturbing but it works for me. May be it will work for you too.


sbs1.jpg


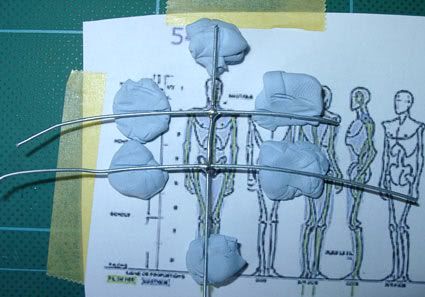
The first thing I did was to resize my anatomical charts to the new scale. Chart courtesy of pF member Aeronaudts.

A new 90mm mannequin was sculpted and cast for future projects. The casting was fitted with wire and assembled using the chart and the dividers.

Next step: posing the figure.

Any comment, question, remark is very welcome, as usual.

Cheers,
Quang :)
 
Quang, Great to see you posting something, your "photgraphic" threads were always a favorite of mine, besides sometimes it's nice to watch someone else. :) ~Gary
 
Gary's right. It's a great, useful and usable link. (y)

Tor, here's my actual resized chart. For some reason, it appears smaller on my monitor :eek: . But it should be alright when you print it.
Creafigs-man90.jpg


Luis, this is the first of a NEW 90mm series from PiLiPiLi. ;)

Thank you guys for your comments.

Quang
 
Quang, thanks for sharing your current project with us, I'm not much of a big size figure guy but your work is one of the best.

Are you going to let us know whats the theme of your project or is going to be a surprise for the end? :)

Looking forward to the next step of this SBS

Eduardo
 
looks interesting Quang - always love these sort of threads - I guess it will be an interesting subject.....native american? ;)

Those charts are very useful - Quang(?) posted them ages ago scaled to different sizes; 54mm, 75mm, 90mm, 120mm
I scaled one down to 1/35 scale like this:
armature-construction.jpg


Are they still on Creafigs?
 
Hello Quang!

Hey those are pretty cool armature pieces. Yours are a lot more "skeleton" like than mine. That is a good thing though as it makes it easier for you to position the ball socket at the hips correctly. With my armatures, it is more of a "theoretical" spot inside the pelvis. Cool!

I find it interesting that you think changing scales is traumatic! Yes, it is a pain to have to make new armature parts, but once you have them it is all gravy after that. Between my toy work, figures in widely varying scales and a couple of bronzes I have done pieces in scale ranging from 1/48 scale (37mm) up to 1/6 scale and even larger for busts. Your use of antaomy charts is essentail in my opinion. Without them, it is too easy to make proportion mistakes which are extremely difficult to correct. It is better to be sure about these things :) !

I actually LIKE jumping around from scale to scale! It keeps your 3 dimensional thinking flexible. The only caveat I would add about frequent scale changes is that it is somehow easier for things to go awry in the larger scales. I think this has to do with the inability to take in the totality of the figure easily when you are right in front of it. It is easier to think holistically in the smaller scales because of this.

Viva la difference!! :lol:

Mike
 
Originally posted by bonehead@Nov 16 2005, 12:26 PM
I find it interesting that you think changing scales is traumatic!
Well, Mike, it's just that I always liked the notion of the proverbial 'figure sculpting itself' that you can only get through automatisms acquired after years of painful and tedious experience :lol:. Changing scale means that I have to do it all over again.

Joking aside, it's the 'logistics' of the smaller scale that annoy me most: new technical requirements for moulding and casting, new packaging, new size of label, new artwork,... Well, I won't know unless I do it, will I? ;)

Your remark about the hip bone ball socket is spot-on. Most anatomical errors in posing/stances stem from mislocating that critical spot.

Rob: I still have the various sized charts on my hard disk. Anyone needs them, just email me.

Eduardo: to start this new series, I'm sticking to what I'm most familiar with: Native Americans although it's a period and tribe I've never dealt with before. So stay tuned.

Back to business. Next step: posing the figure
 
sbs2.jpg


The mannequin is pinned into a working base. For this first venture, I decided on a straight up and down pose (won't tempt the devil ;) )

A straight pose doesn't mean it has to be rigid and stick-like. Note how the thigh bone (femur) angles inward and how the profile looks sinuous. What I'm aiming at is a sense of balance and fluidity.

May looks simple to you but I spent a lot of time with this step. Sometimes, I get it instantly some other times, it can take days. :(

Q.
 
Alors là c'est vraiment une bonne nouvelle, je pense que je vais suivre cette partie de près. En espérant qu'il y ai un maximum d'image. J'ai toujours aimé de voir comment travaillaient les sculpteurs, chacun à son approche bien personnelle, et je suis curieux de nature :)
 
Originally posted by Aeronaudts@Nov 17 2005, 02:23 AM
J'ai toujours aimé de voir comment travaillaient les sculpteurs, chacun à son approche bien personnelle, et je suis curieux de nature.
Moi aussi, Benoît, moi aussi. ;)

Teasung: I think I saw you at Euro but didn't realize it was you until well late after the show. Anyhow, thanks for the comment.

Q. :)
 
Great thread Quang...I'll really enjoy following your progress.
Very well made mannequin too...easy to take in the different areas.
Looking forward to the next step.

Roy.
 
Hello Guys,

I had some mannequins in 54 and 70 mm from Stuart (stormtroopers).
Now i read that you guys casting the mannequins.
Is there somewhere a treat on PF of is there on the internet something to find. I did a google search but there is so many, and so many not usefull.
Hope somebody of the sculpters can help to something similar.

Marc
 
Marc,

I think the disappointment comes from the fact that modellers often confuse 'mannequin' with 'academic/nude figure'.

A mannequin as a sculpting aid is NOT a figure. It serves to establish the 'landmarks' of the figure (landmarks are salient spots on the body after it's been clothed i.e. arm sockets, hips, elbows, knees,...).

Here's an example. Landmarks are represented by the red spots.

landmarks.jpg


As such, on a mannequin, there are only 3 masses that remain constant (and therefore can be useful as castings): the head, the torso and the pelvis. All the other components (arms, legs, spinal colum, neck, hands, feet) are movable and best done with wire.

If you want to replicate the pose of the example with an academic/nude figure, you'll have to chop it to an extent that you will end up with no figure at all! ;)

HTH

Q. :)
 
Back to bidness. 'Freezing the pose'.

Once a satisfying pose is achieved, it has to be freezed up by running liquid superglue in the joints followed by a drop of kicker. Then putty is applied at the hips, midriff, shoulder and feet.

sbs3.jpg


What we have now is a firmly anchored mannequin with still a certain degree of freedom in the limbs. It's the last-chance-Texaco for checking, adjusting and correcting as needed.

When it's done, the putty is extended downwards the legs, neck...

sbs4.jpg


I forgot to say that Aves Apoxie was used throughout this project. Guess I could have also used Magic Sculp with the same result.

Q. :)
 
A mannequin as a sculpting aid is NOT a figure. It serves to establish the 'landmarks' of the  figure (landmarks are salient spots on the body after it's been clothed i.e. arm sockets, hips, elbows, knees,...).

Understanding this, my biggest complaint with both commercial figure mannequins and "artists" mannequins is that they tend to neglect the fact that shoulders move independently of the torso and of each other, and move in many directions. Most mannequins make the shoulder joint part of the torso, with no independet articulation available.

An ideal mannequin would allow independent posing of the shoulder joints (i.e. each shoulder could move up, down, forwrd, or backward.)

Mike
 
Dear Quang,

I know what you mean. But a mannequin for me is just as you said. The head, torso and pelvis. The remaining is wire where to build up the musculature.
Now, if you can, how can i make castings of this????
And it is not my intention to make hundreds of it, but around ten pieces will do.

Marc
 

Latest posts

Back
Top