Hi to all.........
The kit in question for this major conversion is Soldiers' Templar Knight 90mm of some time ago.......infact the mould must have got some beatings as the flash was so evident on almost all parts........If my mind was not set for this conversion for quite a while, I would soon have made it up to convert as there were really bad flash lines even on the mail covered legs.........
What I did was to accumulate all the conversion pics and post them all at once instead of driving everyone crazy in waiting for my snail pace
I relied mainly on Ivan our local Hospitaller expert and Osprey's Warrior Series Knight Hospitaller No1 for the info........
Raymond de Puy, the 2nd Rector of the Order of the Knight Hospitallers of St.John, "militarised" the Order, so my caption on the finished piece would be "Let Us Be Soldiers"........I plan to write this in Latin if I find a priest kind enough to translate that for me") .......he would be holding the sword in his right hand as per kit (scratchbuilt item), and holding the Holy Bible in his left instead of the great helm as per kit.
.......he would be holding the sword in his right hand as per kit (scratchbuilt item), and holding the Holy Bible in his left instead of the great helm as per kit.
I started off with sawing the cloak from beneath the shoulders on the upper back so the location of the right arm would be intact and also to retain the stance/pose of shouting defiance, and instigating the Order to "fight".......
I know that the sword was worn beneath the mail long sleeved hauberk and the short sleeved quilted aketon, beneath the monk's cappa, but my vision of Raymond was/is that he put his helmet on the rubble wall beside him, leaned his sheild against the same rubble wall, lifted the sword scabbard while holding the Bible and "shouts" to his brethren........It would have been a real pity to "hide" the intricate sword belting even though some may argue that the knights DEFINITELY wore the sword belt beneath all that attire, and the cappa was propped over the sword which itself only showed the guard, hilt and pommel, the rest being hidden beneath the mail and padded hauberks.........maybe I took some artistic licence here
After the main body was secured with pins and milliput, I moved on to the scratchbuilt items which are,
No1......the sheild which was done from plasic card, lead sheet (from wine bottles), brass nails (stolen from Pa's bench) and an old Airfix aircraft spinner for the sheild boss.....
No2...... helmet which was vacu formed in plastic on an old Matchbox aircraft spinner, brass nails, and lead sheet..........
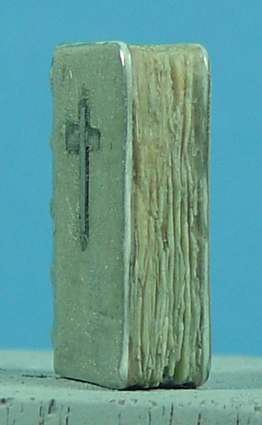
No3...... the Holy Bible which was a piece of distressed balsa wood, covered in plastic sheet and strips for the binding strips, and covered with lead sheet.........
No4.......the sword scabbard which was shaped from a piece of plastic strip and all belting from lead sheet.......the hilt was a wooden skewer filed to shape and covered in lead sheet to depict the leather covering........I have a pic to proove this as my first attempt was not satisfactory with a very big pommel, so I cut a window in the lead sheet to show the wood underneath
Next on the agenda were the legs.........i removed all moulded mail and sculpted and shaped the shoes around the kit's spurs leather belting with almost dry MS.......after fully dry some creases were filed in with sand paper and a small file........the tying knots on the shoes which were an extension of the upper part were done in lead sheet with an actual knot being done and stuck accordingly........ Legs were drilled and pinned to the lower part and the hem of the white linen tunic was again lead sheet..........
Building the lower part started off with layers of milliput and MS for the outer layer.....if you remember well, (Persian Cavalryman Bust) I'm no good at all in working with wet putty as somehow I get lost when I get to put in the folds, so my way is this......I let the putty to dry and work myself in with files and sand paper. However I did apply too much and too little as can be seen from the darker milliput showing thru the MS for the lower part........also for the upper part, again I put too much and too little especially on both arms so I had to "take off" most of it and roughly re shape things, filing, sanding, adding and filling here and there when it was "satisfactory enough"
For the hood's edge, after much of the above mentioned chores I opted for a double folded lead sheet edge and re built around it.........it is still one of my quibbles as I think it does look a bit stiff.......the other quibbles I have is the sculpted mail and yes I did not take the Persian's mail as a lesson.......should have found a tool with a ticker wall so that it would compensate for the "movement" of the wet putty......or approached Augie's idea re cured Duro (only saw it today )......or took Steve's (club mate) advice to use wet Duro or a Duro/MS mix.........well its done now I hope I can paint it, not to look so "undetailed".........
The arms' mail sleeves were sculpted on the inner part of a lead sheet piece and attached to the forearms.........when dry another thin layer of MS was spread on the outer part and shaped with my "C" tool which was a sawn off hypodermic needle......
Next came the cappa sleeves and again these were sculpted on lead sheet........
Head was pinned from the neck and secured with milliput and the mail coif sculpted around it.........the mail ventail was laid out on a lead sheet piece......the leather "ties" are seen on the left side of the gathered coif and yes again they are lead strips")
Finished off with relocating the left thumb and "accomodating" the heavy Bible against the left upper chest.........
The last quibble I recieved so far (its not mine as my eye and mind can envision and justify this.....I hope ) is the "movement" of the right arm and hence the cappa's sleeve and the mail beneath..........what most club mates (Ivan, Steve and David amongst them) argued was that both sleeves should be more perpenicular to the hand and forearm as per weight of both mail and wool.........MHO is that they are right if they can't see the upward 45 degree arch movement as he lifts the sword and stops in that position.........the momentum of the action would surely "blow" both sleeves outwardly for a moment before it would re settle and hang per weight and gravity?? I am DEFINITELY open for any critisiscm/discussion and if I may "compare" this with Alferez's flag upheaval, again MHO is that both actions are "frozen"...... if I may add one last "defence"......I followed Laruccia's short mail sleeve as depicted in the same kit which had "that outward blow from underneath"........I'm not hiding behind one of the MOST GIFTED sculptors abilities here....... all I'm saying is that I'm envisioning that "frozen" moment........
Take care,
Ray
The kit in question for this major conversion is Soldiers' Templar Knight 90mm of some time ago.......infact the mould must have got some beatings as the flash was so evident on almost all parts........If my mind was not set for this conversion for quite a while, I would soon have made it up to convert as there were really bad flash lines even on the mail covered legs.........
What I did was to accumulate all the conversion pics and post them all at once instead of driving everyone crazy in waiting for my snail pace
I relied mainly on Ivan our local Hospitaller expert and Osprey's Warrior Series Knight Hospitaller No1 for the info........
Raymond de Puy, the 2nd Rector of the Order of the Knight Hospitallers of St.John, "militarised" the Order, so my caption on the finished piece would be "Let Us Be Soldiers"........I plan to write this in Latin if I find a priest kind enough to translate that for me
.......he would be holding the sword in his right hand as per kit (scratchbuilt item), and holding the Holy Bible in his left instead of the great helm as per kit.I started off with sawing the cloak from beneath the shoulders on the upper back so the location of the right arm would be intact and also to retain the stance/pose of shouting defiance, and instigating the Order to "fight".......
I know that the sword was worn beneath the mail long sleeved hauberk and the short sleeved quilted aketon, beneath the monk's cappa, but my vision of Raymond was/is that he put his helmet on the rubble wall beside him, leaned his sheild against the same rubble wall, lifted the sword scabbard while holding the Bible and "shouts" to his brethren........It would have been a real pity to "hide" the intricate sword belting even though some may argue that the knights DEFINITELY wore the sword belt beneath all that attire, and the cappa was propped over the sword which itself only showed the guard, hilt and pommel, the rest being hidden beneath the mail and padded hauberks.........maybe I took some artistic licence here
After the main body was secured with pins and milliput, I moved on to the scratchbuilt items which are,
No1......the sheild which was done from plasic card, lead sheet (from wine bottles), brass nails (stolen from Pa's bench) and an old Airfix aircraft spinner for the sheild boss.....
No2...... helmet which was vacu formed in plastic on an old Matchbox aircraft spinner, brass nails, and lead sheet..........
No3...... the Holy Bible which was a piece of distressed balsa wood, covered in plastic sheet and strips for the binding strips, and covered with lead sheet.........
No4.......the sword scabbard which was shaped from a piece of plastic strip and all belting from lead sheet.......the hilt was a wooden skewer filed to shape and covered in lead sheet to depict the leather covering........I have a pic to proove this as my first attempt was not satisfactory with a very big pommel, so I cut a window in the lead sheet to show the wood underneath
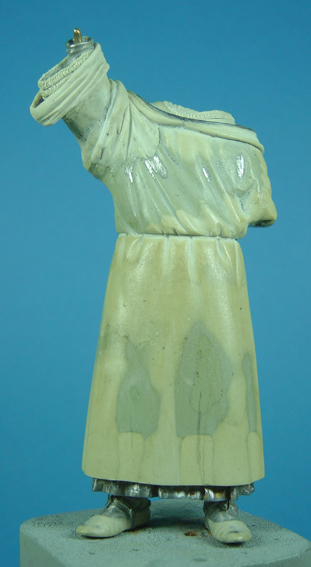
Next on the agenda were the legs.........i removed all moulded mail and sculpted and shaped the shoes around the kit's spurs leather belting with almost dry MS.......after fully dry some creases were filed in with sand paper and a small file........the tying knots on the shoes which were an extension of the upper part were done in lead sheet with an actual knot being done and stuck accordingly........ Legs were drilled and pinned to the lower part and the hem of the white linen tunic was again lead sheet..........
Building the lower part started off with layers of milliput and MS for the outer layer.....if you remember well, (Persian Cavalryman Bust) I'm no good at all in working with wet putty as somehow I get lost when I get to put in the folds, so my way is this......I let the putty to dry and work myself in with files and sand paper. However I did apply too much and too little as can be seen from the darker milliput showing thru the MS for the lower part........also for the upper part, again I put too much and too little especially on both arms so I had to "take off" most of it and roughly re shape things, filing, sanding, adding and filling here and there when it was "satisfactory enough"
For the hood's edge, after much of the above mentioned chores I opted for a double folded lead sheet edge and re built around it.........it is still one of my quibbles as I think it does look a bit stiff
.......the other quibbles I have is the sculpted mail and yes I did not take the Persian's mail as a lesson.......should have found a tool with a ticker wall so that it would compensate for the "movement" of the wet putty......or approached Augie's idea re cured Duro (only saw it today )......or took Steve's (club mate) advice to use wet Duro or a Duro/MS mix.........well its done now I hope I can paint it, not to look so "undetailed".........The arms' mail sleeves were sculpted on the inner part of a lead sheet piece and attached to the forearms.........when dry another thin layer of MS was spread on the outer part and shaped with my "C" tool which was a sawn off hypodermic needle......
Next came the cappa sleeves and again these were sculpted on lead sheet........
Head was pinned from the neck and secured with milliput and the mail coif sculpted around it.........the mail ventail was laid out on a lead sheet piece......the leather "ties" are seen on the left side of the gathered coif and yes again they are lead strips
Finished off with relocating the left thumb and "accomodating" the heavy Bible against the left upper chest.........
The last quibble I recieved so far (its not mine as my eye and mind can envision and justify this.....I hope
) is the "movement" of the right arm and hence the cappa's sleeve and the mail beneath..........what most club mates (Ivan, Steve and David amongst them) argued was that both sleeves should be more perpenicular to the hand and forearm as per weight of both mail and wool.........MHO is that they are right if they can't see the upward 45 degree arch movement as he lifts the sword and stops in that position.........the momentum of the action would surely "blow" both sleeves outwardly for a moment before it would re settle and hang per weight and gravity?? I am DEFINITELY open for any critisiscm/discussion and if I may "compare" this with Alferez's flag upheaval, again MHO is that both actions are "frozen"...... if I may add one last "defence"......I followed Laruccia's short mail sleeve as depicted in the same kit which had "that outward blow from underneath"........I'm not hiding behind one of the MOST GIFTED sculptors abilities here....... all I'm saying is that I'm envisioning that "frozen" moment........Take care,
Ray