WIP Critique Pompeii Garden

planetFigure

Help Support planetFigure:

This site may earn a commission from merchant affiliate links, including eBay, Amazon, and others.
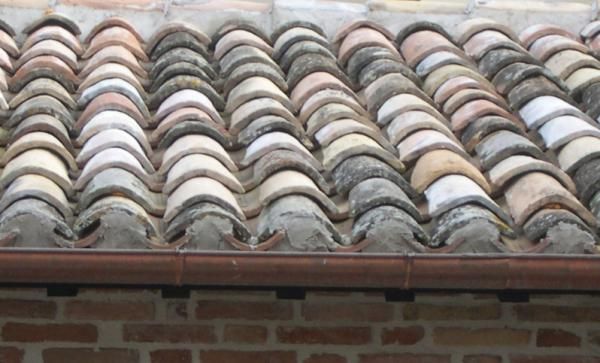
So now about making the rooftiles in miniature.

I used press molds and Magic Sculpt, see pictures below.

I first made several masters for the imbrex, as I wasn't sure of the exact shape yet and how they would stack together.


DSC_0905.JPG


Second picture shows the press moulds. I love this technique, as it is very easy to do: just soften the mold matrial in hot water, squeeze it over the object and let cool to harden....mold ready! After use, the material can be fully recycled, really great stuff indeed.

Next step is to place some MagicSculpt in the mold, press it roughly into shape with a moist point of a chopstick, or back end of a brush, scrape off excess and let harden. After hardening, sand and file away excess putty to get a miniature rooftile.


...to be continued.
 

Attachments

  • DSC_0774.JPG
    DSC_0774.JPG
    729.6 KB
  • 20160508_141317.jpg
    20160508_141317.jpg
    734.1 KB
  • 20160508_141414.jpg
    20160508_141414.jpg
    716.6 KB
  • 20160508_141443(0).jpg
    20160508_141443(0).jpg
    1.1 MB
Outstanding project, and I'm looking fwd to watching it progress.

From your question about how the imbrex is stacked - from your image 1113.jpg - - it looks like the tegula is stacked overlapping (top to bottom) b/c when you just look at them, there is a step. I'm guessing the first tegula is laid down at the edge, and the next one overlaps a bit with maybe some concrete stuffed in the back to keep it even. (?)
The imbrex looks to just spans the tegula gap while also overlapping the imbrex piece in front of it.
img_1113-jpg.269455
 
Thanks Metal and Bob!

Kev, I indeed reached the same conclusions; this was the picture that best explained how it is done. It is interesting that this roof tiling system has been in use for so long. You can still buy these!

I'm still looking for another thing: How did the romans finish the edge between a tiled section of roof and a wall, such as in my vignette. I don't think lead foil was in use then...? Any info or reference is greatly appreciated!

Here are some more pictures of the roof sections.

Tegula made of plastic card:


DSC_0904.JPG


DSC_0899.JPG


Other embellishments around the wall and roof edge, and beams also with selected plastic strips.

To be continued...

Cheers
Adrian
 

Attachments

  • DSC_0924.JPG
    DSC_0924.JPG
    659.5 KB
  • DSC_0925.JPG
    DSC_0925.JPG
    545.9 KB
  • DSC_0926.JPG
    DSC_0926.JPG
    593.4 KB
  • DSC_0903.JPG
    DSC_0903.JPG
    471.7 KB
I'm still looking for another thing: How did the romans finish the edge between a tiled section of roof and a wall, such as in my vignette. I don't think lead foil was in use then...? Any info or reference is greatly appreciated!

The only thing I found was this -
I'm still looking for another thing: How did the romans finish the edge between a tiled section of roof and a wall, such as in my vignette. I don't think lead foil was in use then...
66d20cef1480924d360900cbbc06f650.jpg


And it looks like the end of the "blocks" were just mortared in... HTH
 
Thanks Kev for your effort. I wasn't very clear in my question though, because I meant another 'edge': the one as in my vignette, where one vertical column of tegula lines the wall. Although, based on your picture, I'd consider it likely that this was also simply mortared in.

Thanks again for your support, highly appreciated!

Cheers
Adrian
 
Wow... Very valuable and useful thread, and a joy to watch. Great work indeed !!! Keep it up, I look forward to continuing:) .
Cheers Borek
 
How time flies. It's been a while since I have posted anything and an even longer while since my last update on this project.
All this due to an intercontinental house move and a new job, sucking up all modeling time. My modeling is still focused on the IKEA catalogue and the last time I touched a brush was in August last year.
Making progress on the new man cave however, so I hope to get re-started over the next two months or so.

Anyway, I noted I hadn't posted my last update on this project, so here it is.
I had already started painting actually, but made no pictures yet. Soon....

Cheers,
Adrian
 

Attachments

  • DSC_0065.JPG
    DSC_0065.JPG
    505.5 KB
  • DSC_0067.JPG
    DSC_0067.JPG
    469.4 KB
I've been following this and fascinated by the attention to detail. I wish I had the patience (and skill) to attempt something like this, thanks for taking time out and continuing to post, looking forward to seeing this continue to develop.

Keith
 
Right.
More than a year later. How time flies...

I have been progressing with this project and it is now firmly in the painting stage. However, there is just so much freehand paintwork to do that it is taking ages and I regularly lose the 'mojo' as it is said.
And I moved from Singapore to The Netherlands, which is a horribly time-absorbing thing as well.

Anyway, I will try and post more over the next weeks, but here's a sneak preview of some of the wall-painting.

Cheers
Adrian

20181023_220906 (572x800).jpg
20181023_220854 (752x800).jpg
 
Hi Adrian

Great to have you posting , you have been busy moving hope you've settled in now

Thanks for the update those wall paintings look great

Look forward to more updates when you are able

Happy benchtime

Nap
 
Absolutely fascinating work!!!! One of those projects that make one say"Wish I had done it myself".

Oda.
 
Admirable! What I really do like is the colours you are using for the walls. Roman cities were a feast for the eyes in terms of colour. Everything was painted. And in bright colours: statues, temples, houses etc.:)
 
Oh WOW! Looks terrific! Glad you have some time to continue the project.
And best of luck in your new place. :)
 
So glad to see more of this project Adrian, caught my attention when you first posted the start of this build. Painting looks excellent so far and you can just see the level of detail you are achieving.
I could just see Marcus, Stylax and Grumio from the T.V series Plebs leaning against that wall.

Steve
 
Back
Top